Injections
Inject your UI element into plugin.
Use slots
Replace
Plugins can expose slots, so other plugins can use them. The usage of slot is done via injection mechanism.
Injection mechanism contains two elements - plugin definition and enabling plugin in nocto-config.
Firstly, find the slot which you would like to use - you need two variables - plugin ID and slot name.
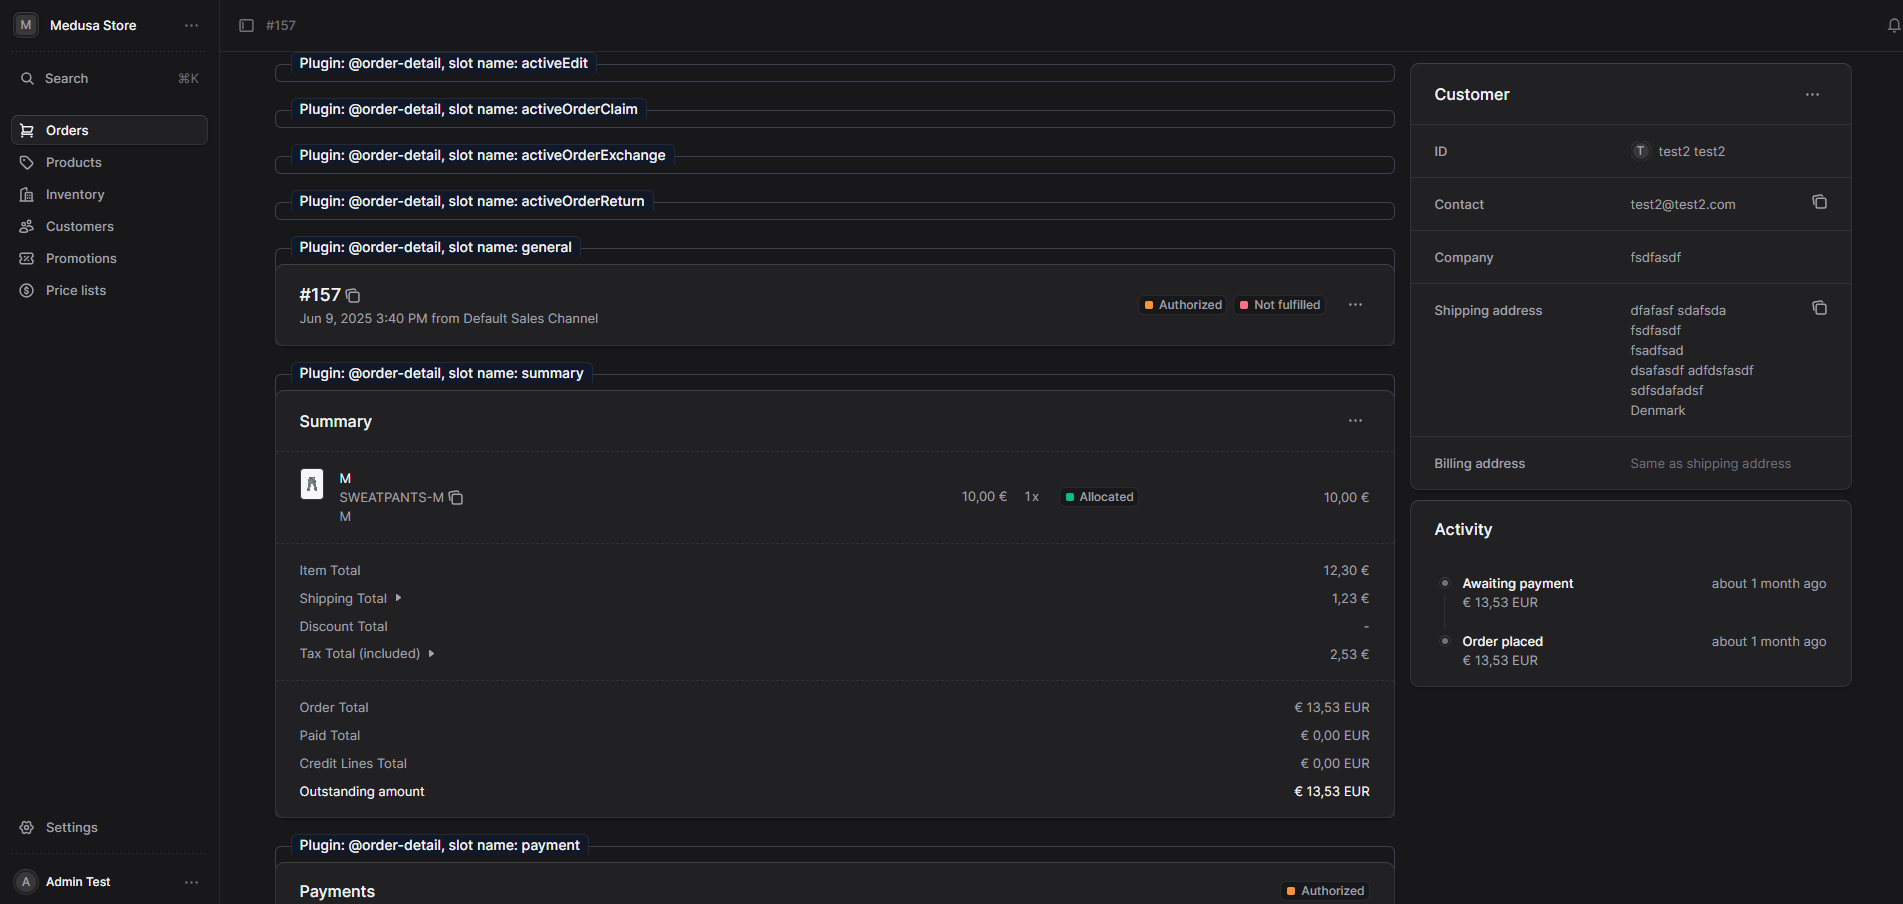
Below you can see how the slot looks like:
return (
    <TwoColumnPage
      widgets={{
        after: getWidgets("order.details.after"),
        before: getWidgets("order.details.before"),
        sideAfter: getWidgets("order.details.side.after"),
        sideBefore: getWidgets("order.details.side.before"),
      }}
      data={order}
      showJSON
      showMetadata
      hasOutlet
    >
      <TwoColumnPage.Main>
        <NoctoSlot pluginId="@order-detail" name="activeEdit" runtimeProps={{ order, orderPreview }} fallback={<OrderActiveEditSection order={order} />}/>
        <NoctoSlot pluginId="@order-detail" name="activeOrderClaim" runtimeProps={{ order, orderPreview }} fallback={<ActiveOrderClaimSection orderPreview={orderPreview!} />}/>
        <NoctoSlot pluginId="@order-detail" name="activeOrderExchange" runtimeProps={{ order, orderPreview }} fallback={<ActiveOrderExchangeSection orderPreview={orderPreview!} />}/>
        <NoctoSlot pluginId="@order-detail" name="activeOrderReturn" runtimeProps={{ order, orderPreview }} fallback={<ActiveOrderReturnSection orderPreview={orderPreview!} />}/>
        <NoctoSlot pluginId="@order-detail" name="general" runtimeProps={{ order, orderPreview }} fallback={<OrderGeneralSection order={order}/>}/>
        <NoctoSlot pluginId="@order-detail" name="summary" runtimeProps={{ order, orderPreview }} fallback={<OrderSummarySection order={order} plugins={plugins}/>}/>
        <NoctoSlot pluginId="@order-detail" name="payment" runtimeProps={{ order, orderPreview }} fallback={<OrderPaymentSection order={order} plugins={plugins}/>}/>
        <NoctoSlot pluginId="@order-detail" name="fulfillment" runtimeProps={{ order, orderPreview }} fallback={<OrderFulfillmentSection order={order}/>}/>
      </TwoColumnPage.Main>
      <TwoColumnPage.Sidebar>
        <OrderCustomerSection order={order} />
        <OrderActivitySection order={order} />
      </TwoColumnPage.Sidebar>
    </TwoColumnPage>
  )
Slots are exposed via NoctoSlot which takes pluginId and name. Let's say you would like to inject UI element in summary slot. Firstly you need to create your own plugin which will inject the custom UI element.
Create plugin:
There is a separated section how to create a plugin. Here, we are just showing how to use injections mechanism, but firstly we encourage to read Create plugin
Here is the example:
import Slot1 from "./Example";

export const myPlugin = {
  id: "@custom-injection",
  injections: () => [
    {
      pluginId: "@order-detail",
      slot: "summary",
      component: Slot1
    }
  ]
}
You can see that injections parameter has been used together with pluginId and slot. Under component parameter you are defining the React component which you are injecting.
Finally, as every plugin, you need to enable it by putting its id into nocto-config:
import { NoctoConfig } from "@rsc-labs/noctojs-plugin-system"
import {
  Sparkles,
} from "@medusajs/icons"

export const noctoConfig: NoctoConfig = {
  plugins: {
    "@login": {
      config: {
        title: "Welcome to Nocto",
        hint: "Sign in to access",
        mainIcon: Sparkles
      }
    },
    "@custom-injection": {},
    "@orders": {},
    "@order-detail": {},
    "@campaigns-routes": {},
    "@categories-routes": {},
    "@collections-routes": {},
    "@core-routes": {},
    "@customer-groups-routes": {},
    "@public-routes": {},
    "@reservations-routes": {},
    "@settings-routes": {}
  },
  sidebar: {
    "@orders": { order: 1 },
    "@products": { order: 2 },
    "@inventory": { order: 3 },
    "@customers": { order: 4 },
    "@promotions": { order: 5 },
    "@price-lists": { order: 6 },
  }
}
Now, your UI element replaced what was in summary slot.
Add
You can also add your UI elements instead only replacing the available ones. Nocto is using two special suffixes: after and before to inject your UI elements near the exposed slot.
For instance, let's say you want to add new UI element before summary. Instead of using just a slot name, add before suffix to the slot name. Example:
import Slot1 from "./Example";

export const myPlugin = {
  id: "@custom-injection",
  injections: () => [
    {
      pluginId: "@order-detail",
      slot: "summary.before",
      component: Slot1
    }
  ]
}
The Slot1 component will be rendered BEFORE summary slot.
Show slots
Finding available slots might be done through searching the code, but you have also another option. Nocto is using special environment variable called: VITE_NOCTO_SHOW_SLOTS. If set to true: VITE_NOCTO_SHOW_SLOTS=true you will get the information in admin pages about availability of slots.
